该功能类似于类似于emlog碎语插件。根据网上的教程,本站(漫步天涯)进行了适当修改和修正,具体制作过程如下:
STEP1:注册文章类型
在本地写一个post-type.php文件(不要用系统自带的记事本就行),内容是:
<?php
add_action('init', 'my_custom_init');
function my_custom_init()
{
$labels = array(
'name' => '碎语',
'singular_name' => 'singularname',
'add_new' => '发表新碎语',
'add_new_item' => '发表新碎语',
'edit_item' => '编辑碎语',
'new_item' => '新碎语',
'view_item' => '查看碎语',
'search_items' => '搜索碎语',
'not_found' => '暂无碎语',
'not_found_in_trash' => '没有已遗弃的碎语',
'parent_item_colon' => '',
'menu_name' => '碎语'

);
$args = array(
'labels' => $labels,
'public' => true,
'publicly_queryable' => true,
'show_ui' => true,
'show_in_menu' => true,
'query_var' => true,
'rewrite' => true,
'capability_type' => 'post',
'has_archive' => true,
'hierarchical' => false,
'menu_position' => null,
'supports' => array('title','editor','author')
);
register_post_type('talk',$args);
}
?>
然后把这个post-type.php文件传到你的网站主题的根目录下,也就是“wp-content/themes/主题名称/”这个文件夹里。
然后在主题的根目录下的functions.php这个文件的最后插入
include_once('post-type.php');
STEP2:创建’碎语’页面模板
复制主题文件夹下的page.php文件,重命名成talk.php,然后在talk.php文件的开头加上这几句话:
<?php
/*
Template Name: suiyu
*/
?>
然后接着在这个文件里找到这句
<?php if (have_posts()) : while (have_posts()) : the_post(); ?>
再找到
<?php endwhile;endif; ?>
然后把这两句话以及之间的所有语句全换成:
<?php if (have_posts()) : while (have_posts()) : the_post(); ?>
<?php $limit = get_option('posts_per_page');$paged = (get_query_var('paged')) ? get_query_var('paged') : 1;query_posts('post_type=talk&post_status=publish&showposts=' . $limit=20 . '&paged=' . $paged);if (have_posts()) : while (have_posts()) : the_post(); ?>
<div class="talklist">
<span class="talkcontent">
<?php the_content(); ?>
</span>
<span>
<p class="talktime">
<?php _e('Published by','themejunkie'); ?> <?php the_author_posts_link(); ?>
<?php the_time('Y年n月j日G:i'); ?>
</p>
</span>
</div>
<?php endwhile;endif; ?>
<?php if (function_exists('wp_pagenavi')) wp_pagenavi();else { ?><div class="talkpagenavi"><?php previous_posts_link('【« 上一页】') ?> <?php next_posts_link('【下一页 »】') ?></div><?php } ?>
<?php wp_reset_query(); ?>
注意:在主题文件夹下找不到符合条件的page.php文件的,可以到wordpress的默认主题复制一份过来使用。
STEP3:添加CSS
做完上面的步骤以后,我们就需要美化一下这个碎语的页面啦,在这里给大家提供一个简单地css样式,大家把它添加到主题的style.css里就可以了:
.talklist {
border: 1px solid;
border-radius: 25px;
padding-left: 15px;
box-shadow: 1px 2px 10px gray;
border-color: beige;
padding-right: 15px;
margin-top: 15px;
margin-left: 149px;
margin-right: -149px;
}
.talktime{
text-align: right;
}
.talkpagenavi{
margin-top: 15px;
margin-left: 149px;
margin-right: -149px;
text-align: center;
}
.talkcontent img{
max-width: 500px;
width: expression(this.width > 500 ? "500px": (this.width+"px"));height:auto;
margin-top: 15px;
}
STEP4:创建页面
嗯,就是创建页面,把页面的模板选成“suiyu”就行了,然后进WordPress后台就会发现惊喜了。
PS.如果想为页面添加个性题目,可以在talk.php的以下代码(保留该行代码)前
<?php if (have\_posts()) : while (have\_posts()) : the\_post(); ?>
添加上下面的代码:
<div class="talklisttop">
<?php echo mb_strimwidth(strip_tags(apply_filters('the_content', $post->post_content)), 0, 300,"…"); ?>
<?php wp_link_pages( array( 'before' => '<div class="page-link">' . __( 'Pages:', 'themejunkie' ), 'after' => '</div>' ) ); ?>
</div> <!--end .entry-->
并在以上面提到的样式表中补充上以下样式:
.talklisttop {
border: 10px solid;
border-radius: 25px;
padding-left: 15px;
box-shadow: 1px 2px 10px gray;
border-color: beige;
padding-right: 15px;
margin-top: 25px;
margin-bottom: 25px;
margin-left: 110px;
margin-right: -188px;
font-size:22px;
font-color:gray;
font-weight:900;
}
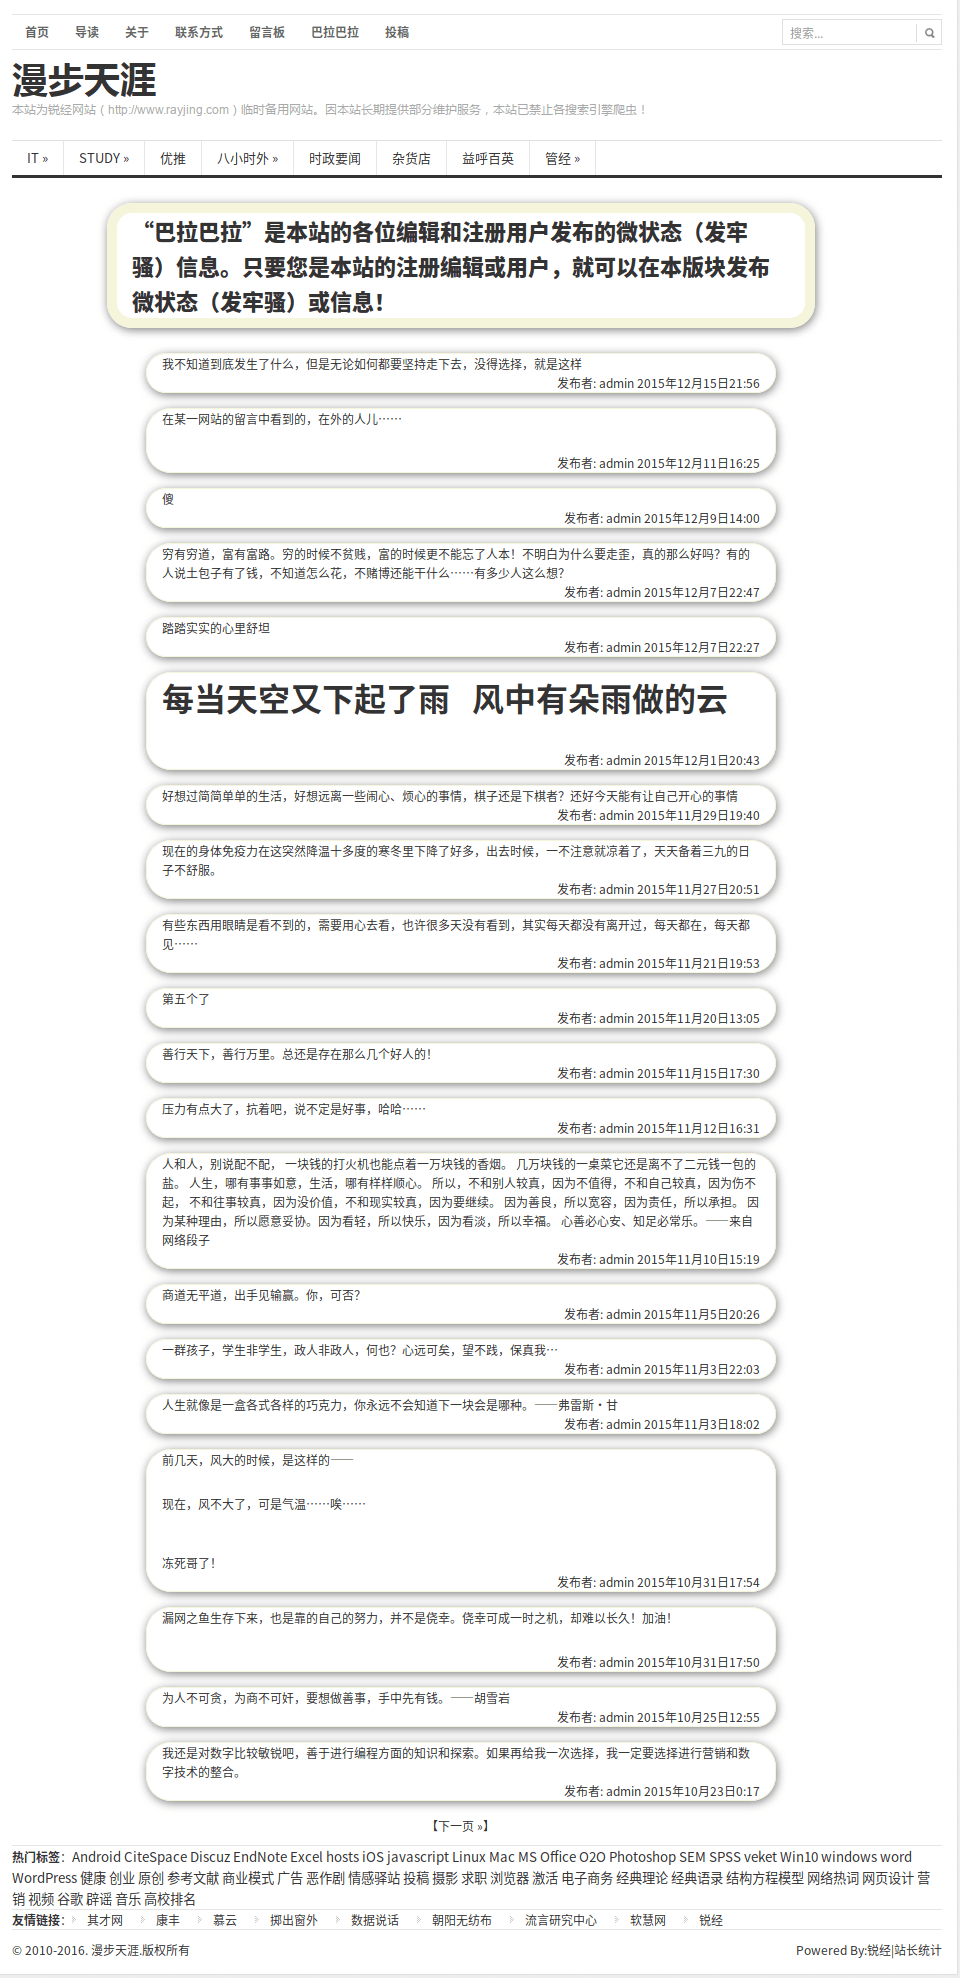
效果如下图:
版权声明:本文由 Duter2016 在 2019年11月04日发表。本文采用CC BY-NC-SA 4.0许可协议,非商业转载请注明出处,不得用于商业目的。
文章题目及链接:《给WordPress添加碎碎语(类似于微博)功能》

